AutoStakkert! by Emil Kraaikamp is a great freeware program for grading, aligning, and stacking planetary images. It will work with uncompressed AVI or SER videos, MJPEG AVI videos, or with a series of FIT, BMP, TIFF, PNG, or JPEG still frames. It supports both color and gray scale recordings. The program does not do any (wavelet) sharpening however, so to sharpen your stacks - and you likely have to perform this step - additional software is required.
AutoStakkert! currently lacks the ability to process most compressed movie formats. To convert compressed movie formats, one can use the freeware program VirtualDub. But if possible it is best to avoid using lossy compressed formats altogether, as the image quality likely will suffer from compression effects.
 |
|
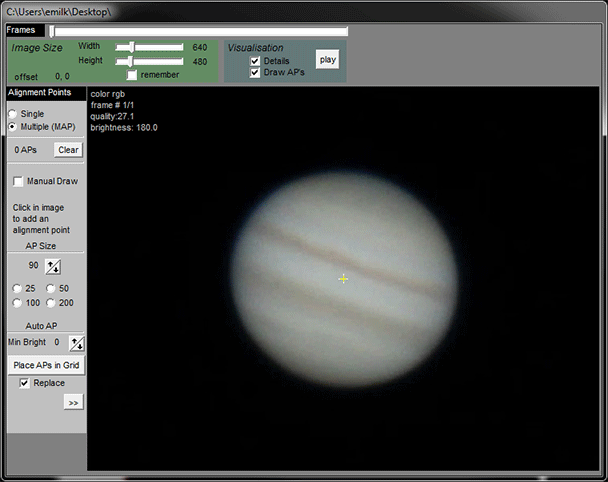
AutoStakkert!2's Interface.
|
Overview
AutoStakkert! goes through a video, and analyzes each frame. It grades and sorts them based on a quality estimate that you specify - either edge sharpness or gradient sharpness.
A reference frame is then created behind the scenes that is used as a template for alignment and stacking.
You then select alignment points. You can use a single alignment point, but multiple alignment points usually work much better. You can do this manually, or let AutoStakkert! do it automatically.
AutoStakkert! then aligns these points to the reference frame that was previously created and stacks the number of frames that you specify.
A final aligned and stacked image is produced. A sharpened version of the aligned and stacked image can also be created at the same time, and can be used to preview the results.
MOV files in AutoStakkert! ?
If we shoot video in a DSLR camera, it is often saved in a MOV file format that must be converted to an AVI format for AutoStakkert! to work with. Some programs that record Live View will record directly in AVI format.
Unfortunately, there are lots of different flavors of AVI. Some will open directly in AutoStakkert! and some need to be opened and re-saved as an AVI in VirtualDub. Here is a list of those that will open directly:
- AVI converted from MOV in VirtualDub - opens without problems in AutoStakkert!
- AVI from EOS Camera Movie Record - needs to be converted in VirtualDub
- AVI from Backyard EOS - opens without problems in AutoStakkert!
Help! AutoStakkert! can't open my file!
If you find a file that you think should work in AutoStakkert!, please let me know! Compressed AVI formats other than MJPEG will likely NOT be supported anytime soon.
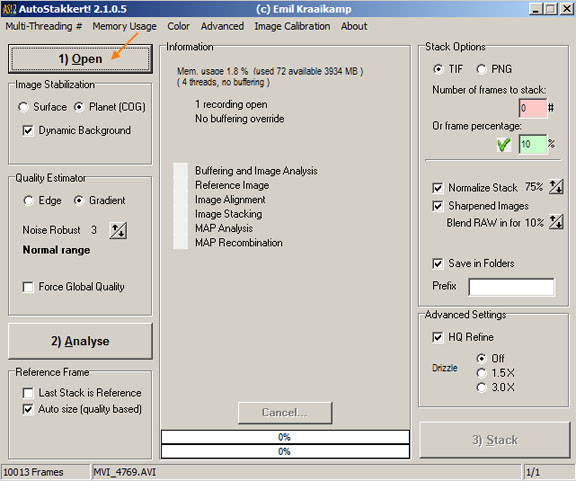
1. Open the Video or Image Files
First click the large button on the top left of the operations screen labeled 1) Open. You can also click, drag and drop a file onto AutoStakkert!'s operation window. If you want to load a series of still images you have to click and drag and drop them.
If you hover your mouse cursor over an item, more information about it is usually revealed.
 |
|
AutoStakkert!'s operations screen
|
- Image Stabilization Panel
Select the type of image stabilization based on the type of image you are working with.
Select Planet (COG) for a planet like Jupiter. (COG) means "center of gravity".
Select Surface for lunar or solar surface detail such as craters and sunspots.
Expand - uses the maximum image size possible, but edges might not look good.
Crop - crops to a smaller image where the alignment points are located, produces sharper edges.
- Quality Estimator Panel
Select Gradient for larger planets such as Saturn, Jupiter or Mars when it is larger than about 15 arc seconds. Each alignment point will use its own set of frames to stack, except when force global quality is selected.
Select Edge for smaller bright planets such as Venus, Mercury or Mars when it is smaller than about 15 arc seconds. All alignment points use the same frames to stack.
Set Noise Robust based on the amount of detail and noise in the video. If it contains very fine details and was taken in excellent seeing, use a lower number. If there is a lot of noise use a higher number.
Only check Force Global Quality if you use multiple alignment points and the stacked image shows seams. This will force AutoStakkert! to use the same subset of frames for stacking and should prevent seams from occurring.
|
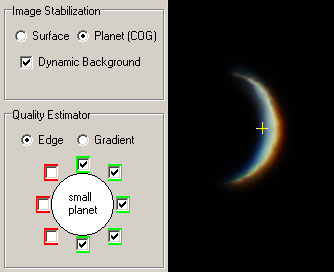
For a planet with one sharp sunlit side, and the other side with a diffuse edge from a shadow terminator, such as this example of Venus as a crescent, use Planet (COG) as the Image Stabilization type, and select Edge as the Quality Estimator, and uncheck the boxes on the shadow side of the planet on the Quality Estimator.
|
 |
|
Uncheck Edge boxes on the shadow side of a planet.
|
|
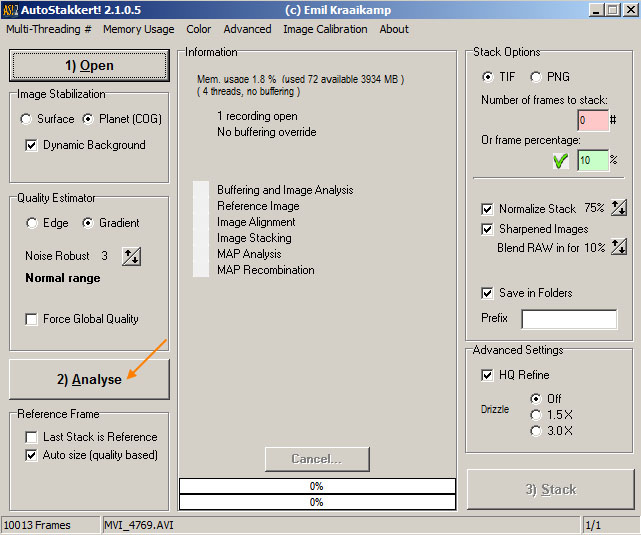
2. Analyse the Images
Before analyzing the image, take a look at the image display window. If the image of a planet is small in the frame, click and drag the Set Size sliders. You are not required to change the size, but I highly recommend it for planetary recordings. Cropping the image will significantly speed up the processing, and will also enable AutoStakkert! to filter out frames with missing information because the planet moved to the edge of the screen for example. If you change the size after analysis, it will be forced to run the analysis again when you stack.
Click on the large button at the bottom of the left hand column labeled 2) Analyse.
 |
|
AutoStakkert!'s operations screen
|
AutoStakkert! will now examine and analyse each individual frame in the video and create a stack that will be used as a reference frame. This is a carefully created stack onto which all the alignment points for all frames will be aligned.
As AutoStakkert! analyzes the frames you will see a progress bar move across the bottom of the second column where information about the processes being conducted is displayed.
 |
|
AutoStakkert!'s quality graph
|
After the analysis is finished, AutoStakkert! will display a quality graph at the bottom of the information column. Two plots are superimposed on each other. The jagged up-and-down plot shows the frame quality in the order that the frames were shot - it shows the varying quality of the frames based on the seeing. The green line is a plot of the quality of the frames sorted by best quality first, then dropping off to lesser quality on the right.
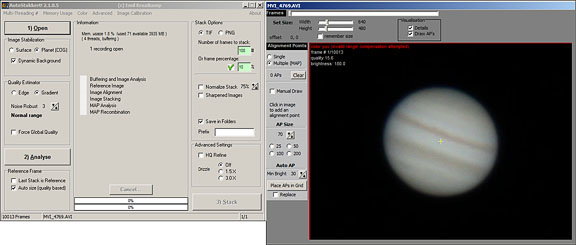
3. Set the Image Alignment Points
Now we will go to the image display box and set the image alignment points.
 |
|
AutoStakkert!'s image display screen
|
- Frames
After the Analyse step that we performed above, the images are sorted by quality. By clicking and dragging the slider at the top of the image display box we can scroll through this sort.
If you click on the word Frames next to the slider, you can change the sort order to numerical. Clicking again changes the sort order back to quality.
You can also click and drag the Set Size sliders if the object of interest is small in the frame and crop down to it. This will increase the speed of the aligning and stacking, and allow for filtering of bad frames containing missing information. If you set these sliders now, it will also force the program to perform buffering and analysis again. So next time, it might be better to start cropping before analysis.
- Alignment Points
Select a single alignment point or Multiple (MAP) alignment points.
The number of alignment points is displayed and there is a Clear button to remove all of the alignment points.
Manual Draw - checking this allows you to manually draw an alignment point - click in the image to set an alignment point.
AP Size (Alignment Point Size) - Use the up and down arrows to change the size of the alignment point boxes. Use smaller sizes for fine high-quality details. Use larger boxes for noisy images and/or those taken under poor seeing conditions.
Min Brightness - Sets the minimum brightness of a feature in the image that can be used as an alignment point.
Place APs in Grid click this button at the bottom of the left-hand column for AutoStakkert! to automatically place a series of alignment points in a grid in the image.
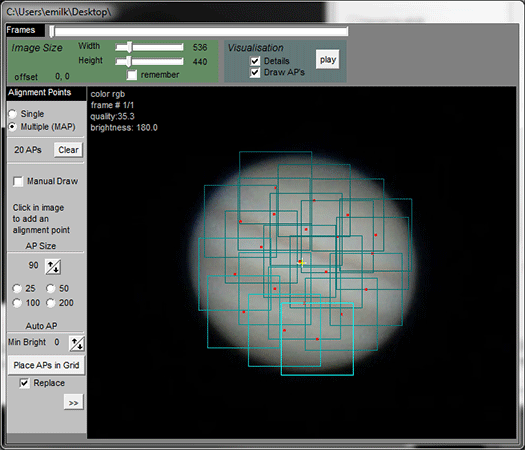
You can manually add alignment points in automatic multiple alignment mode by left clicking in the image. Right click to remove an alignment point. Use the mouse wheel to change the size of the alignment point. For planets I recommend the manual placement of alignment points. Make sure to not use APs that are too small, as the program will fail to align properly and you'll end up with a result that could have been much sharper if you used properly sized alignment points.
The results of manually placing APs on a slightly cropped image is shown below. It is often best to avoid placing APs near the edge of planets.
 |
|
AutoStakkert!'s image display screen with manually placed alignment points
|
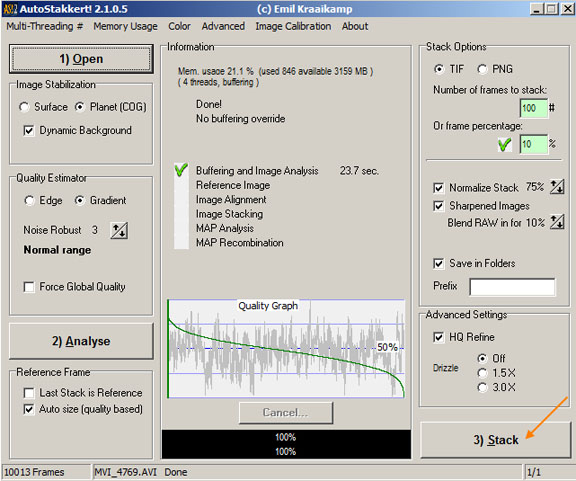
4. Stack the Images
Now we go back to the operations screen and work in the "Stack Options" column at right.
- Stack Options Panel
Select the file type you would like the stack to be saved in - TIFF or PNG. Both formats contain the exact same data, but the PNG images will be compressed (lossless, so no image is lost) .
Select either the number of frames to stack, or a percentage of frames to be stacked. Here I have selected 10 percent of the 10,0013 total frames to be stacked. You can also select multiple percentages and/or frame numbers if you want to find out which stack produces the best results for your images
Check "Normalize Stack". This is useful if you have brightness variations from frame to frame due to things such as passing clouds or varying transparency. It will also make it easier to fine tune the color balance after processing multiple recordings, as each stack is forced to have the same final brightness.
Check "Sharpen Images" if you would like AutoStakkert! to apply a default sharpening to the image. If this is checked, AutoStakkert! will save two copies of the stack, one unsharpened and one sharpened.
"Blend in Raw" allows you to specify a percentage of the original unsharpened raw file to be blended into the sharpened image.
Check "Save in Folders" and add a prefix to the image file name if you would like.
- Advanced Settings Panel
Check "HQ Refine" (high quality) on unless you have an ancient computer or really know what you are doing. I recommend to ALWAYS leave this setting on, in fact, it will be hidden in a next release.
Check drizzle if the images are undersampled or if you want a slightly larger image scale. Drizzling will increase the stacking time significantly, and most of the time it is not needed.
Finally, click the 3) Stack button at the bottom right-hand corner.
 |
|
Stack Operations
|
AutoStakkert! will now go through all of the images and align and stack them precisely. As it does this, you will see the progress indicators at the bottom of the middle column move, and a checklist in the center of this column get checked as each task is completed.
The final stacked image, as well as a sharpened version, will be saved in a special folder in the directory with the original AVI file.
|
|
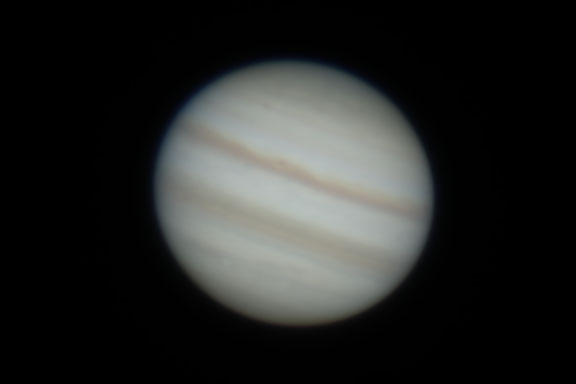
Hold your mouse cursor over the Jupiter image to see a comparison of the stacked image to the sharpened image. The image stack is from the best 10 percent of 10,013 total frames in 3 minutes of video of Jupiter shot with a C11 Edge at f/20 with 2x Televue Powermate Barlow in average seeing conditions using a Canon T2i (550D) and 640x480 Movie Crop Mode at 60fps shot at 1/60th of a second exposure at ISO 400.
|
Above we can see the potential of the data in the raw stack with AutoStakkert!'s default sharpening applied to it. There are more adjustments and enhancements that we can perform on the image that are covered in other sections of the book A Guide to DSLR Planetary Imaging by Jerry Lodriguss.
AutoStakkert!2 Tips from Emil
It is best to stack only the frames with good quality. Don't stack a lot of frames just to have a large stack. A stack with a smaller number of frames will be more noisy however. This gets back to the quality of the seeing. If you don't have decent seeing for at least some moments while recording, you are not going to get very good results, no matter how many or how few frames you stack.
For some objects, you will get better results by manually setting multiple alignments points.
Add a bit of overlap to manually placed alignment points.
Keep alignment points away from the edge of a planet.
Alignment Point Size - Smaller alignment points are generally less stable than big ones. It is easy to lose track on a small part of an image, especially if it is very noisy or a dim feature, and if the seeing is poor. But potentially, smaller alignment points can track finer movements and provide better quality. That is an important trade-off here. It is actually possible to mix multiple alignment point sizes. If for example there is a small moon in front of Jupiter, add a small alignment point around it (and the shadow), and you'll see the stacking improves quite a bit around the moon and shadow.
For large planets like Jupiter and Saturn, with good detail in them and a large image scale, use around 30 alignment points with a size of about 75 to 125. This one is a bit tricky, as the size of the alignment points depends a lot on the imaging scale.
For smaller details, such as the polar cap on Mars, or moon shadows on Jupiter, use extra alignment points with smaller sizes for those features, in addition to the existing alignment points with normal sizes.
When planets are small, such as with Uranus or Neptune, use a single alignment point with a large area around the entire planet.
For the Sun, always use the gradient quality estimator. Solar images that are correctly exposed usually have little noise. If the seeing is good and the detail is fine, use a smaller value of 2 for Noise Robust under the Quality Estimator.
For images that have small fine detail, use smaller alignment points.
For Saturn, use manual alignment point placement. Diagonal lines on the rings are not good places for alignment points. Place the alignment point on the rings to include a perpendicular feature like the edge of the planet, or the black space at the tips of the rings.
Good alignment points can track a feature in two perpendicular directions. This is why alignment points placed near the limb of a planet don't work so well.
For small bright objects like Venus and Mars, the edge quality estimator may work better than the gradient quality estimator.
If you have problems with seams in the stacked image that are caused by poor transparency, use Forced Global Quality under the Quality Estimator panel. If the seams are caused by the alignment points being too small, use larger alignment points and re-stack the image.
This tutorial was done with AutoStakkert! version 2.1.0.5.