AS!2 can be downloaded from autostakkert.com. Optionally, you may want to use Castrator for some images, in particular images with relatively much black space around the object. It could be used to reduce the size of a recording if you want to retain the original recording to save on disk space, or if you want to reduce the size of a video recording prior to processing with AutoStakkert to improve the processing time.
The user interface of AS!2:
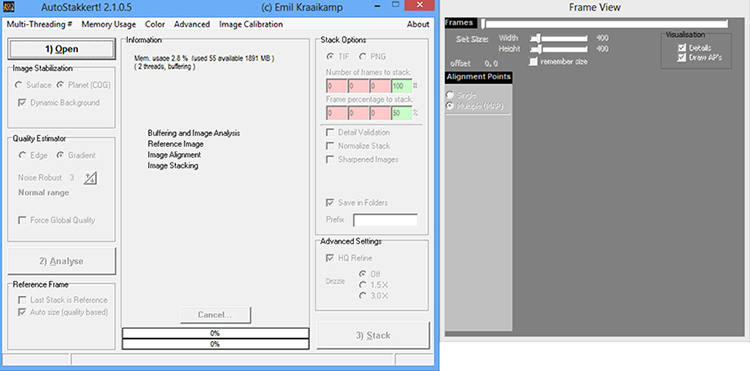
1. Open the recording
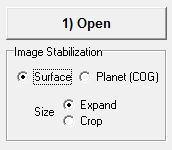
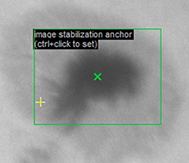
You can simply open one recording, but with AutoStakkert it is also very easy to run a batch and process many images automatically. All you have to do is select the files that you want to process and configure all required settings necessary for processing once for the first recording. Please notice that the Image Stabilization anchor, which is placed automatically (but can also be placed manually with CTRL+click), is not hold to the configured position in a batch. You may want to account for this, because it means that if you want the anchor to be positioned at the lower right for example or somewhere off center, it will not be placed there in a batch even if you manually configure so at the first recording. In that case, the stabilization anchor will always be placed at the center of the image. You could however change the size of the image stabilization anchor by using the 1-9 keys where 1 will give you the smallest possible anchor and 9 the largest. A larger anchor could potentially include the area of the image you want your anchor to stabilize on, but is to far off center to fit in a small anchor. The first thing to do after opening the recording with AutoStakkert, is to set the Image Stabilization option. By setting the Image Stabilization, AS!2 will be able to properly align all frames relative to each other. The two options for Image Stabilization are:
Surface: Use this option for surface images, such as lunar and solar images
Planet (Center of Gravity): Use this option for planetary images
After configuring this option, you can notice how the recording aligns itself in the Frame Window of AS!2. Precise alignment of the individual frames is done at a later stage. The next step in AS!2 will be to align the features in the frames to about the same place. The option between Expand and Crop allows to set the final image size to your preference, where Expand will show as much as possible (including less sharp edges) and Crop only the sharpest part of the image. For Surface images you can also manually create a coarse alignment window in the Frame Window by holding the CTRL button and clicking 1 time at the preferred location. The place where you click will be the center of the alignment window. It is recommended to place this alignment window at a prominent feature that is apparent in ALL frames (for example a sunspot, or a particular crater on the moon).
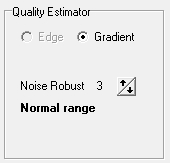
After setting the Coarse alignment, set the Quality Estimator value depending on the quality of the images. While a value of 2 should be good for high quality data and 6 for dim/noisy data, a value of 3 usually works well for most images. You can always try to experiment with this setting and see what works well for your images.
SOLAR/LUNAR: At the Quality Estimator, Edge is greyed out because that option is suited for planetary recordings where it uses the edge of a planet to estimate the quality of the frames.
PLANETARY: With planetary images, you have the choice to choose Edge as Quality Estimator. This method of quality estimation can be useful for recordings of for example Venus, where you only want AS!2 to estimate quality of frames based on certain parts of a planet. It may work well on Venus images, where you could have a sharp edge and a shading terminator and only want AS to estimate frame quality on the sharp edge rather than the terminator.
2. Analyze the recording
After clicking the Analyze button and AS!2 finishes that step, surface features have been aligned to appear at about the same place. In the steps ahead we will add alignment points to properly align features and prepare the frames for stacking. While the amount of frames used for the reference frame can be set, it is a good practice to leave this option to Auto size (quality based). To manually set the amount of frames for the reference, uncheck the Auto size option and set the slider. AS!2 will use the resulting stack as reference.
Now go to the Frame Window of AS!2, containing a display of a frame of the recording.
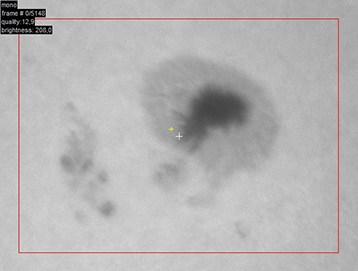
SOLAR/LUNAR: The automatically placed red rectangle indicates the region in which AS!2 will be able to place alignment points. After analyzing, AS!2 knows which region of the recording is for certain on every frame and can have an alignment point. This region will in any way be the sharpest part of the recording. Outside of the rectangle, AS!2 is not able to automatically place APs (alignment points) and it is also not recommend to manually place them there.
PLANETARY: In case of a planetary image, AS!2 will have aligned the frames to about the same place after which you can place alignment points.
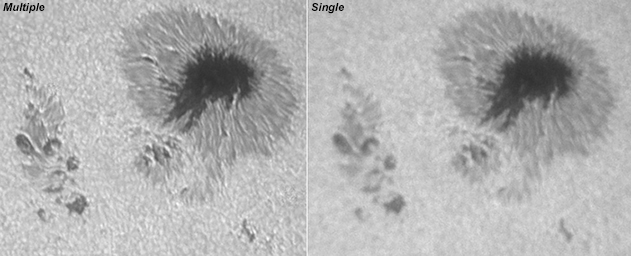
In the left part of the Frame window, the alignment point setting must be made. It is highly recommended to use Multiple (MAP) as it will produce a better result. It is a good option to have the alignment points be placed automatically for some images, but if you want you can also place them manually. To place them manually, tick the Manual Draw box and make alignment regions by drawing them (the place you initiate a click will be the upper left part of the alignment region).
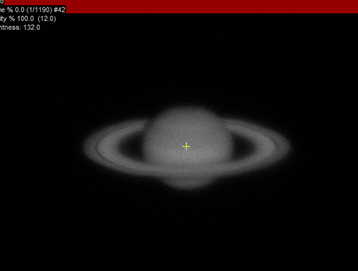
PLANETARY: It is a good idea to manually place alignment points for a recording of Saturn. You should in this case create a number of alignment points that should have significant overlap. It is recommended to place these alignments on prominent features, rather than on a dim part of the image at which AS!2 may have difficulties to properly keep its alignment box locked on the same feature in every frame.
SOLAR/LUNAR: It is a good option to automatically place alignment boxes, this will create a grid over the whole image.
The difference for a solar image:
In this instruction, Mutliple (MAP) is used and APs are placed automatically in case of the solar image, because it gives the best result. After setting the alignment point setting to Multiple, the AP size needs to be set. The AP size is the size of each individual alignment box that will be placed on the image. The size of the AP you should choose depends on the quality and resolution of the image. For high resolution, you want to use a small AP size versus a larger AP size with lower resolution images. In this case I choose for a size of 40. Eventually, the minimal brightness of the APs can be set when choosing to automatically place the APs. It indicates the minimal brightness of the background the automatically placed APs must have at least. After setting that, click Place APs in Grid to have AS!2 place the APs on the image.
To clear APs, click the Clear button next to the AP count below Multiple (MAP).
Now, return to the main window of AS!2 and set the Output options in the right pane of the window. I usually choose TIF as output file format for the final stack(s), but you may want to choose for PNG. The Stack at frame number option allows to stack at a certain frame number, and the percentage option to stack (for example) the best 10% of all frames. It is possible to let AS!2 also include sharpened images by checking the appropriate box. This option exists to give an impression of the sharpness of a stack, rather than being a ''final'' image. By checking Save in Folders AS!2 saves the stacks in folders. In this case AS!2 will make only one folder for the 10% stacks. Using Single alignment point, it is possible to fill in more percentages/frame numbers and have AS!2 stack at all of those values. AS!2 will make more folders in that situation. In case of checking Sharpened images, a secondary folder will be created containing the convolved images. It is recommended to keep HQ Refine on, as it will ensure a more precise alignment of the frames. You are now ready to stack!
When you have ''Save in Folders'' selected, the images are saved to separate folders (depending on the settings), ALWAYS at the location of the image/video files you are loading. For example, given that the recording EXAMPLE.avi is located at C:\Users\User\Documents then the folders are created in that same folder, and could have the following path: C:\Users\User\Documents\AS_p50_Multi.
3. Stack the images
The stacking process can take a while depending on the amount of frames, size and amount of APs and the available memory on the computer. The process of the steps AS!2 performs can be nicely followed.